🧬 Demystifying the Double Helix: A Simple Guide to the DNA Replication Fork
Have you ever looked at a replication fork diagram and felt your head spin? You’re not alone. At the center of the entire process is a simple, Y-shaped structure called the DNA Replication Fork.
This guide breaks it down step by step, so you can master the concept without stress.
The Big Picture: Why DNA Replication Matters
Before a cell divides to grow, repair, or reproduce, it must create a perfect copy of its DNA. This process is called DNA replication, and it happens with incredible speed and accuracy. Even a single mistake can lead to a mutation or a faulty cell.
If you want to review the basics of DNA before continuing, check out our Science Tutoring page for simple explanations.
Meanwhile, the double helix structure requires multiple enzymes to unwind, stabilize, and rebuild it. All this activity happens at the DNA Replication Fork.
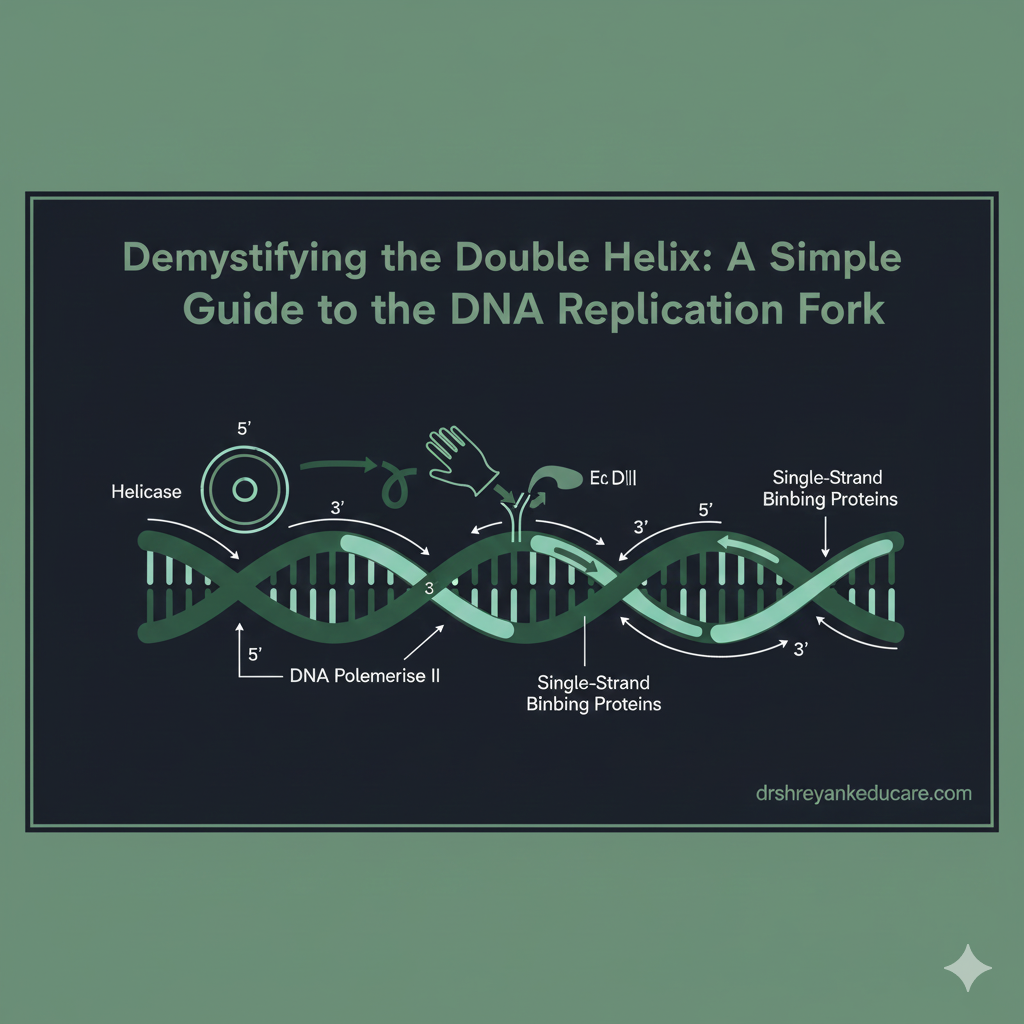
Step 1: Unzipping the Double Helix (The Job of Helicase)
Think of DNA as a zipper. Replication begins by unzipping it.
The enzyme DNA Helicase moves along the double helix and breaks the weak hydrogen bonds between the base pairs (A–T and C–G). This separation forms the characteristic Y-shaped replication fork.
If you want to learn more about the structure of the double helix, visit this helpful guide from the National Institutes of Health.
At the same time, Single-Strand Binding Proteins (SSBPs) attach to each opened strand. They keep the strands apart and prevent them from reforming the double helix.
Step 2: The Template System — Why DNA Replication Is Semiconservative
Before rebuilding begins, it’s important to know that DNA replication is semiconservative.
This means each new DNA molecule contains:
- One original (parent) strand
- One newly synthesized (daughter) strand
Therefore, the parent strand acts as a template to ensure accuracy.
To explore this idea further, the Nature Education resource explains semiconservative replication clearly.
Step 3: The Two Sides of the Fork — Leading vs. Lagging Strands
DNA Polymerase can only build DNA in the 5′ → 3′ direction.
Because DNA strands run in opposite directions (antiparallel), the enzyme copies each one differently.
A. The Leading Strand — The Easy Side
- The template runs 3′ → 5′, so the new strand grows toward the replication fork.
- Primase adds a single RNA primer.
- DNA Polymerase then builds continuously.
- As a result, the leading strand forms as one smooth, uninterrupted piece.
To strengthen your understanding of enzymes, check our page on Biology Tutoring.
B. The Lagging Strand — The Tricky Side
- The template runs 5′ → 3′, so the new strand grows away from the fork.
- Primase adds multiple RNA primers.
- DNA Polymerase builds short segments called Okazaki Fragments.
- The process repeats each time the fork opens more.
For a detailed illustration, you can view this external animation from Khan Academy.
Step 4: Cleanup and Sealing — Finalizing the DNA
The lagging strand needs extra finishing steps:
- Primer Removal:
Another DNA Polymerase removes the RNA primers and replaces them with DNA nucleotides. - Sealing the Gaps:
DNA Ligase joins the Okazaki fragments. It seals the gaps and forms one continuous strand.
When cleanup is complete, the cell ends with two identical DNA molecules, each containing one old and one new strand.
Master This for Biology Success
The DNA replication fork highlights semiconservative replication and the action of multiple enzymes. Being able to draw, explain, and label this process will help you excel in exams.
If you still find antiparallel strands or DNA Polymerase confusing, don’t just memorize—ask for help! Our simplified explanations make tough Biology topics easy to understand.
Want Clear, Simple Explanations for Every Biology Topic?
We offer 1-on-1 Biology + Science tutoring for Grades 6–12 and university students.
📞 672-514-7587
🌐 drshreyankeducare.com
📘 Explore more: All Tutoring Programs